The MT 48 features some very useful effects that you can implement on your Input channels (analog, optical, and any Peered channels from a Merging interface/second MT 48.)
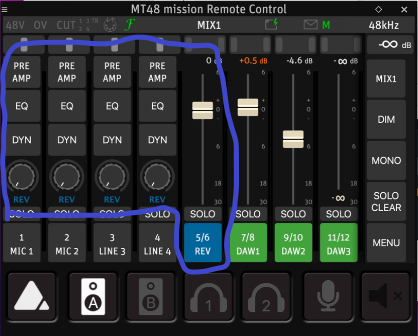
Much like any mixer, the signal flow works from top to bottom - starting with your Preamp section, then to EQ, then to DYN (Gate/Compressor/Limiter), and finally to Reverb which is in a Send/bus format.
(Reverb is specifically set this way because generally different channels will get varying levels of reverb, and functionally you will not use a 100% "wet" level inserted on every channel like you would an EQ or Compressor.)
You can access this by selecting a track on your mixer and pressing the physical Home/menu button.
Starting with the Preamp:
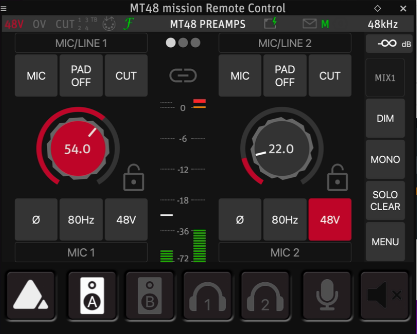
The Preamp section is quite important, as it allows you to select:
Mic vs Line signal type on Inputs 1-2, and
Inst/Line on Inputs 3-4
Double Pad (input volume reduction by either -12, -24 dB on Mics 1-2)
Cut - mutes the input
Phase - reverses microphone polarity (phase reversal)
Low Cut Filter- Triple low cut filter selectable (40 Hz /60 Hz /80 Hz)
48V - Microphone phantom power, required for condensor microphones
Gain - rotary knob in the center controlling input level. This can be controlled using the rotary knob on the mixer itself, or your mouse scroll wheel if using the Remote Control application on your computer. This is where you will set your input signal level before recording
EQ
This is a 4 band EQ, allowing you to pinpoint and "cut" problem frequencies (or embellish/"boost" target frequencies.)Type/Frequency/Gain/Q are all selectable, and controlled with the rotary knob or mouse scroll wheel in the Remote Control app.
Type features low cut, low shelf, peak, high shelf, high cut (EQ type, shape)
Frequency: 20 HZ - 20 kHz
Gain -24 dB to + 24dB
Q: is the curve shape in how wide a frequency is cut or boosted (1 is wide, 100 is very narrow)
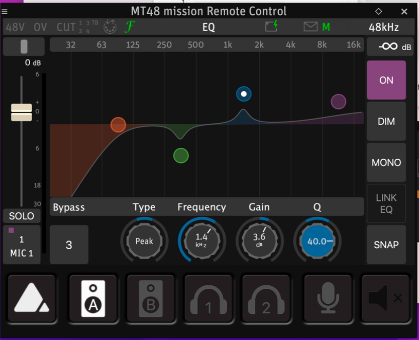
You can reset a frequency band by long pressing the Gain dial on the touch screen.
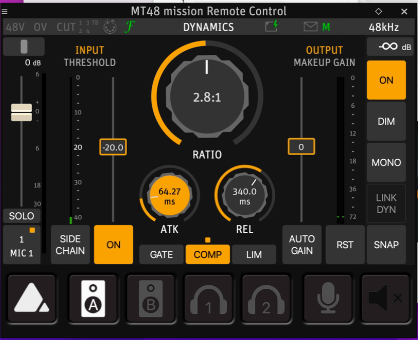
Dynamics
Features a gate, compressor, and limiter which can be toggled between on the bottom.
You can engage up to all three (or any combination of the gate, compressor, and limiter) as desired.
GATE: used to suppress unwanted noise in short pauses of the unwanted signal.
COMPRESSOR: used to make levels more even. Loud parts become softer, and soft parts come up to limit the overall dynamic range altogether.
LIMITER: a special type of compressor used to make sure a signal doesn't exceed a certain level
Reverb:
Reverb is utilized as an aux send in lieu of an inserted effect directly into the chain and only can be used for monitoring purposes.
This allows any track to send a portion to the reverb bus to be affected - exactly like the aux section of a mixer.
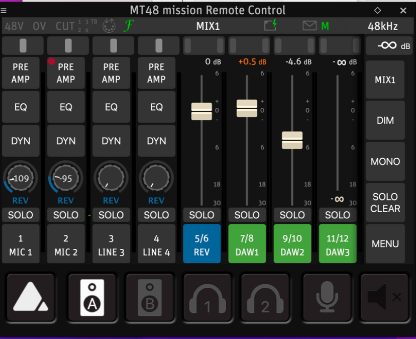
The REV dials act as the channel's send level, and 5/6 is the stereo Reverb bus which controls the overall level.
This can be adjusted per mix (1-4.)To open Reverb, highlight the track and click the Triangle menu button; or, single click in the Remote Control app and select Edit Rev.
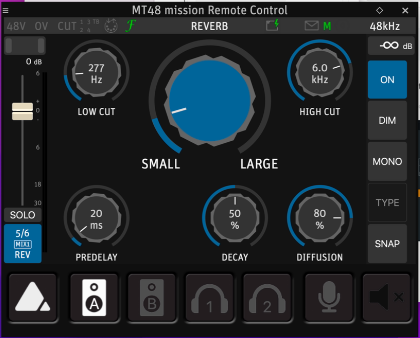
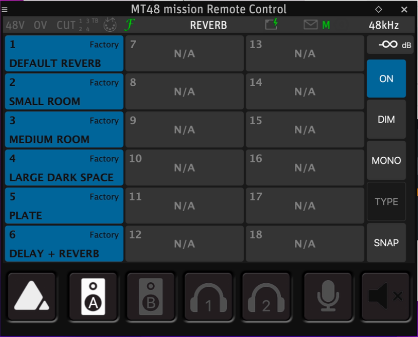
Additionally, there are presets you can get started with by clicking SNAP and selecting one to load:
Back in the mixer the total amount of reverb can be adjusted using the REV fader.
Recording with effects: To be able to send your effected tracks (post EQ and Dynamics, no Reverb) in your recording software, in MENU > SETTINGS > USB I/O, there are three Post FX options you can toggle:
Analog In Post FX
Optical Post FX - only applicable with an external ADAT device connected via Optical
Peered Post FX - only applicable with a second Merging Technologies interface connected via AES67
Enable Analog In Post FX, along with Optical Post FX and Peered Post FX only if you are using external ADAT or a second MT 48 / Merging Technologies interface.
Otherwise, enabling Optical and Peered options will convolute your input options unnecessarily.
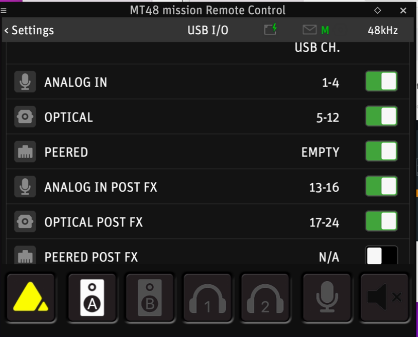
Once the Post FX options are enabled, this gives you the capability to record just a dry track, a wet track, or both separately by setting up one or two audio tracks accordingly set the the appropriate inputs in your DAW.
Snapshots (presets)
EQ, Dynamics, and Reverb each contain their own snapshots, or presets, preloaded.
To open, simply click the SNAP button in the bottom right of the screen while in a given DSP module. You can also save your own presets that you make as well, in the event you'd like to use the same parameters of an effect later.

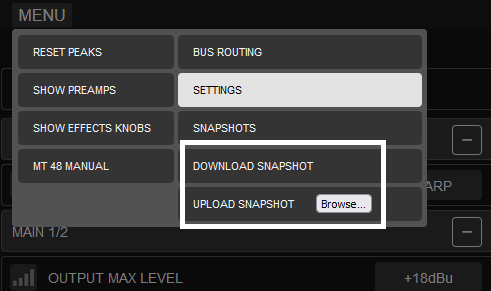
When you tweak an effect to your liking, simply click SNAP in the lower right, select an empty Bank, and give it a name, comment (if desired), and color, then press STORE. When you load this effect up on another track, you can now click SNAP to find this ready to be recalled when desired. aSnapshots can also be downloaded and uploaded from Web Control within in the top left Menu for import and export.
Bus Effects
Each output bus has access to EQ and DYN, which further shapes the overall mix for any output pair.
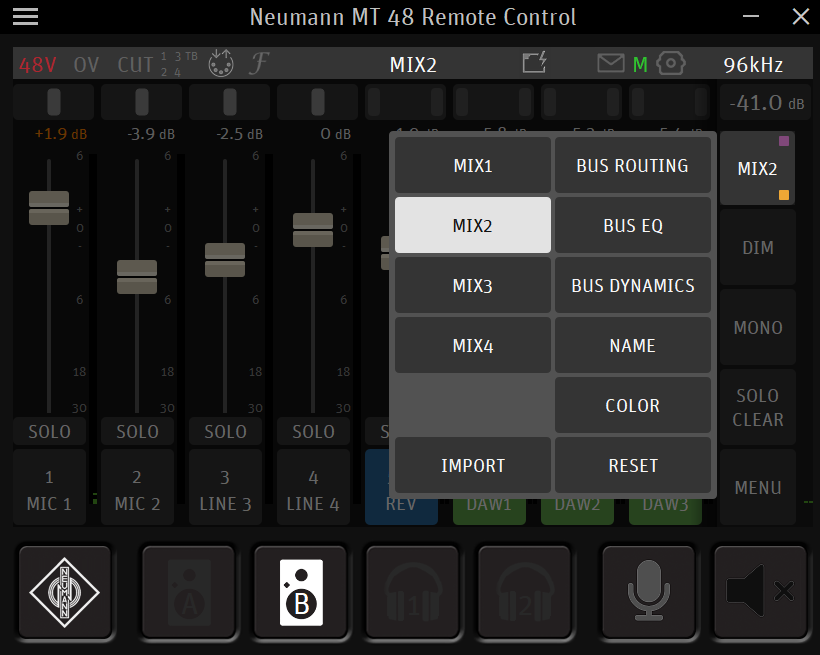
To access, click on the Mix Number in the upper right of the screen, which exposes the above menu.
From there, you can apply Bus EQ or Bus Dynamics as you see fit to further shape the entire mix.